A 'snoedel' is a small soft fabric 'handkerchief' doll originally created by a Dutch woman wanting a small doll for her premature infant. Today, they are a wonderful way to quickly create a small soft doll that can be kept close to a babie's mother to pick up her scent and then placed near baby--offering reassurance that mama is near.
Popular in major Children's Hospitals for newborns or seriously ill children, they are a wonderful way to keep mom close even when she is unable to physically be holding her baby.
They are now manufactured by a licensed company for hospitals everywhere, but are easy to make, yourself. I love making this one and hope to make more and more of them to give away as gifts.
So, for those who would love to create one of their own, it's as simple as taking two squares of soft fabric and adding a little cotton, poly, or wool stuffed head, and then using a smaller square to create a little hat.
Not wanting to copy the manufactured original, I discovered a way to create my own little snuggler by using two pieces of fabric instead of one double-sided one and simply inserting one hemmed piece through an opening in the other, adding a little hat and there it is..the cutest little snoedel/snoodle doll ever!
Creating a little snuggle doll is a wonderful way to keep mama's scent close to baby and is highly recommended in NICU and PICU hospital wards everywhere. Portland's own OHSU/Dornbecher Childrens Hospital actually buys them to make sure each baby in the Pediatric Intensive Care (PICU) gets one by his or her side.
Here a quick tutorial with photos and direction on how to make a snoedel (pronounced snoodle) doll :
Step 1:
Select two squares of fabric of any size. I used a 12" squares for mine. You will want a solid fabric for one and any print (or even a contrasting solid) for the other. Here I used white diaper flannel and a lovely piece of Lotta Jansdotter cotton fabric for the print. Because the flannel is underneath it always available for touch and when opened up, actually rests on any part of the baby needing soothing.
Now serge the edges/and or turn the edge under as if it was a handkerchief and stitch down around the squares.
Step 2:
Fold the solid flannel in half, wrong sides together. Now, sew a little line of stitching down the outside edges of your point about 3 inches long on each side or right below the head placement area. This creates a little point almost triangle hat shape that you will stuff with fluff to form a head. Now, turn that fabric with the stitching, right sides out and...
Stuff a little head shaped size of cotton, poly, or wool stuffing into the little head placement area.
Step 4:
Shaping it into a little head shape, holding the neck area, take a strong thread and wrap around and around to tighten, then tie and triple knot tightly. This area will later be covered up by finished hand stitching and any decorative floss or tiny ribbon you very securely sew down. I sewed my trim in many places for security!
Step 5:
Fold your print fabric into a triangle, right sides up.
Step 6:
Cut a tiny opeing into the very center of the printed square. Your solid fabric will be inserted from underneath and up through this opening so the head can peek out!
Step 7:
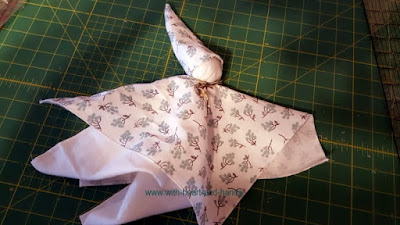
And there it is now peeking through! Very carefully turn under the raw edges of the print fabric around the neckline. Hand sew a tiny seam all around and onto the white fabric below to secure and make more attractive.
Step 8:
Time to make a little hat.
I used a 4" square for mine but did turn some under for shaping later.
Folding this little square right sides together, cut a curved hat shape. This one little piece creates the hat simply by sewing a 1/4" seam along that curved edge, turning the hat right side out and tucking the raw bottom edge under.
Place the hat on your little doll's head and adjust to fit at any jaunty angle you like and carefully hand stitch the turned under edge of the hat around the doll's head.
How magically simple is that?
And how sweet!!!!
And how sweet!!!!
Note:
And as you can see from the second photo, you want your triangle to counter complement one another, so make sure it s arranged that way before stitching it all together at the neckline! It should be in an almost star shape.
And as you can see from the second photo, you want your triangle to counter complement one another, so make sure it s arranged that way before stitching it all together at the neckline! It should be in an almost star shape.
A little 'snoedel' (Dutch for snuggle) 'Snoodle Doll" for baby!
Cute in any baby's room when up on a dresser or bookshelf, as babies without constant supervisioon should not have anything loose in their cribs or co-sleepers, but welcomed in NICU wards at Children's Hospitals everywhere for babies who need, and get, special care.
This one is in a NICU/PICU ward at Dornbecher Children's Hospital in Portland, Oregon where neo-natalogists not only welcome them, but prefer that all new babies in their unit have one. Dornbecher's actually purchases them from a major manufacturer to make sure that all PICU babies get this simple but important comforting after surgery!
Simpler version: two pieces of sewn together and turned fabric as shown.
My version in this tutorial is two hemmed squares used separately, these are two squares hemmed together and turned right side out. Either way is cute- yet quite different.
Note to Lucy woods and her church ministry :
What a lovely comment to discover this morning! It is a personal blessing to be of help or service to others..so you are more than welcome to print off or use anything on my blog.
But is especially meaningful that you want to use this tutorial for a snoedel.I like my fluffier, magical version...but the simple one is cute, too!...
Other posts linked to this one:


5 comments:
Thanks for posting this. I wonder also, if it could be used with Alzheimer's patients - or is it too small. Its a great idea.
I am with Church of the Lakes, Methodist in Canton, OH, We have a roup that makes quilts and scent dolls, I love you idea and it uses less fabric than ours, would I be able to copy your pattern .
Thanks, Lucy Woods
What a lovely comment to discover this morning! It is a personal blessing to be of help or service to others..so you are more than welcome to print off or use anything on my blog.
But is especially meaningful that you want to use this tutorial for a snoedel. Blessings to you and your wonderful group!
Can you make these out of muslin fabric?
Becky, muslin would be lovely! Soft and sweet! Any cotton fabric that's soft works wonderfully!
Post a Comment