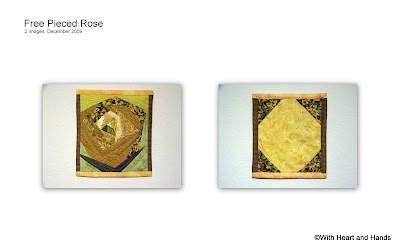
This is my "Liberated Rose"...a donation quilt made to benefit the Alzheimer's Art Quilt Initiative. Others immediately began to make similar quilts and now, I've learn to even use my "Liberated Rose" as their name for this technique.
Such is life and quilting..but my quilt predates the others by months and even years..as does my tutorial. It is similar to the larger rose quilts made famous by Valori Wells and it behooves me to share my gratitude and admiration for the first free-pieced roses in any form..whether she is acknowledge in other blogs or not.
Such is life and quilting..but my quilt predates the others by months and even years..as does my tutorial. It is similar to the larger rose quilts made famous by Valori Wells and it behooves me to share my gratitude and admiration for the first free-pieced roses in any form..whether she is acknowledge in other blogs or not.
Free-Piecing a Rose: a photo tutorial
Begin by selecting a wild and crazy variety of fabric scraps in many color ray choices.
Step 1. Using a foundation fabric or batt, begin by cutting a small geometric shape of any kind and adding your first random piece to it.
2. Trim piece down a bit. Flip over and finger press down as you go. (Iron when necessary.)
3. Add a third piece.
4. Continue adding bits and scraps in a variety of color choices. You want to add color, depth and value. Add, stitch, trim down, flip...add, stitch, trim down, flip.
5. Change value as you go around and around. A real rose has light and dark all over in various sections.
6. If you see something that isn't quite right, you over piece it a bit, use indelible markers, as I did to color in some patterning of your own, or just let it be and call it nature and natural effect ;)
7. Your rose grows and grows.
8. At some point you check it's size and dimensions out a bit. I needed mine to be smaller than 9" x 12" for an AAQI donation, so I had to prune a bit.

9. My 'pruning' of my rose resulted in an overlay piecing of more exterior or framing color and the delineation of a more defined and graphic leaf sections.
10. I add a bordering/ binding effect that will actually be under a false back for hanging purposes.
11. Added on "covering" backs hide all of the extras on art quilts that traditional quilts don't have a problem with.
12. Even small art quilts need hanging. AAQI recommends a variety of ways to do this on their website. See: How to Hang A Priority: Alzheimer's Quilt
Instructions for Fast Finish Triangle Corners for hanging quilts using a dowel between corners.
Chopstick or similar for very small quilts
I used the 'Fast Finish Triangles' technique" using 4" squares, folded into triangles. I placed them in all four corners. You can use something as simple as plastic drinking straws or wooden skewers inserted at hanging rods in a small art quilt.
I used the 'Fast Finish Triangles' technique" using 4" squares, folded into triangles. I placed them in all four corners. You can use something as simple as plastic drinking straws or wooden skewers inserted at hanging rods in a small art quilt.
And it's done!
PS: For anyone who has since used this technique and my own 2009 Liberated Rose name..please link back to this original site source to be nice!
(closed end of 2013 into 2014 but we raised far more than our 1 Million Dollar Goal!! Hurrah for Ami Simms and all of us who worked so hard behind the scenes and/or making an unbelievable numbers of small format art quilts for donation and sale by AAQI to earn funding for Alzheimer's research !


9 comments:
Love this!
I love it. I've never done paper piecing. Question...is there a lot of waste with the material? Hugs
Nicely explained!!!
Nice one!
Amazing! I almost, almost would do this. Not quite ready but I think about it. You make it look... well... fun!
I'm back! Had to sneak a peak again as I explained this to a friend on the phone but also, I read your comment on Julie's blog. You're just the biggest heart every. (Julie, Thinking Thursday)
Thanks for the wonderful tutorial. I tried it this morning and now I can't stop!
This is a great tutorial, I have seen this before but it was paper pieced and I prefer this!! Thank you so much!
I found this tutorial by accident and I really like it. The pattern for this rose I have seen before is paper pieced and this is a much better idea. Thank you so much:0
Post a Comment